Vendor Registration
INTRODUCTION
We offer a simple, yet powerful, platform for you to showcase your products and reach an unlimited number of customers. Khasir is the perfect solution for businesses looking to increase their customer base and maximize profits.We also handle the delivery, ensuring your customers get their purchases quickly and safely.We take pride in our customer service, making sure your customers have the best possible experience when buying from you.
CHARGES
There are basically two forms charges for our services.
- Advertisement; Periodic charges for product advertisement as subscription base. This service is mainly for vendors who wants to advertise their product so that customers can call them, meet them physically to purchase the product or service .
- Product sell; We charge a small percentage on every product we are able to sell out for a vendor. These work for those vendors who wants to sell their products online on the platform. Therefore, customer will be able to purchase the vendor’s product directly from the platform.
We provide the perfect platform for businesses of all scale to reach a global audience with their products. The requirements to register your business varies upon your business scale.
- Small Scale Business
- Medium Scale Business
- Large Scale Business

Small Scale Business
These business are usually own and controlled by single individual with small capital. Below are the necessary tools needed to manage and control your online store on khasir for a small business scale owners.
Requirements
- Vendor verification documents: Vendor must provide a clear means of identity either of Drivers license, National Identity card or a recent Utility bill not less than 3 month. Unverified vendor will not be enabled to sell.
- Online store access device: Managing an online store requires a device which you can be able to gain access to your store. As a store owner, Preferably a laptop or desktop can be used to access your online store. Mobile device can be used but has limitation on user experience.
- Product packaging materials: For physical product that require packaging before delivery, store owners are required to wrap up the product neatly and keep it ready for pick up by the delivery guy after receiving an order.
- Bank details of account you will like to receive payments to.
Medium Scale Business
A business were by the owner of the business assigned a shopkeeper to manage the business. Therefore, there is the business owner and a shopkeeper. Below are the tools necessary to manage and control your online store on khasir for a medium scale business owners.
Requirements
- Vendor verification documents: Vendor must provide a (1) Corporate Affairs Commision certificate (2) clear means of identity either of Drivers license, National Identity card or a recent Utility bill not less than 3 month. Unverified vendor will not be enabled to sell.
- Online store access device: Managing an online store requires a device which you can be able to gain access to your store. As a store owner, Preferably a laptop or desktop can be used to access your online store. Mobile device can be used but has limitation on user better experience.
- Product packaging materials: For physical product that require packaging before delivery, store owners are required to wrap up the product neatly and keep it ready for pick up by the delivery guy after receiving an order.
- Staff profile: Vendor can open an account for his shopkeeper under his account.
- Bank details of a business account you will like to receive payments to.
Large Scale Business
These are supermarkets and integrated shopping malls. Large scale business such as supermarkets where multiple number of staff is required to manage the online transactions, order unit, customer care unit, packaging unit, product managing staff, etc.There is the business owner and a shopkeeper. Below are the tools necessary to manage and control your online store on khasir for a large scale business owners.
Requirements
- Vendor verification documents: Vendor must provide a (1) Corporate Affairs Commision certificate (2) clear means of identity either of Drivers license, National Identity card or a recent Utility bill not less than 3 month. Unverified vendor will not be enabled to sell.
- Online store access device: Managing an online store requires a device which you can be able to gain access to your store. As a store owner, Preferably a laptop or desktop can be used to access your online store. Mobile device can be used but has limitation on user better experience.
- Product packaging materials: For physical product that require packaging before delivery, store owners are required to wrap up the product neatly and keep it ready for pick up by the delivery guy after receiving an order.
- Staff profile: Vendor can open an account for his staff under his account.
- Bank details of a business account you will like to receive payments to.

To register as a vendor, Click on Register at the arrow A or My account at arrow B.

- Get your shop top banner, profile picture other documents ready.
- Fill in the form with the necessary informations required.

- After filling in the necessary information. Click on Register.
- From the Menu, click on Vendor Dashboard. You will be directed to your online shop.

Vendor Dashboard
Vendor Dashboard gives you an overall summary of your store and activities. From this dashboard, you can easily manage your stores and also get quick insights. Besides that, it will provide suggestions on how to make your store more appealing to your customers.
You can find an overview of your store, page view, orders, earnings, reviews and add products. There is also an announcement section. It displays all the latest notice or announcement from administrator.

Vendor Verification is very important. Without it a Vendor will not be allowed to Sell or Advertise. When you click on the “Start Verification” button this modal will appear. You can upload your document depending on the scale of your business.

Small Scale Business; Vendor verification documents: Vendor must provide a clear means of identity either of Drivers license, National Identity card or a recent Utility bill not less than 3 month. Unverified vendor will not be enabled to sell.
Medium Scale Business;Vendor verification documents: Vendor must provide a (1) Corporate Affairs Commision certificate (2) clear means of identity either of Drivers license, National Identity card or a recent Utility bill not less than 3 month. Unverified vendor will not be enabled to sell.
Large Scale Business; Vendor verification documents: Vendor must provide a (1) Corporate Affairs Commision certificate (2) clear means of identity either of Drivers license, National Identity card or a recent Utility bill not less than 3 month. Unverified vendor will not be enabled to sell.
Vendor Dashboard Menus Explained
Create a product from the Vendor dashboard
To create a product, navigate to the vendor dashboard. And then click on Products from the left menu. After that click on the Add New Products button from the top right corner.
You’ll get a new window where you will be able to create a new product giving all the details only.

The Basic information about a product are the and click on Create product
This will take you to where you can add more details to your product

The common information about a product are the
- Product name
- Price
- Product category
- Short description
- Description
- Discount price is optional. You can even schedule discounts for a certain amount of time. You can enter a starting date and end date to apply automatic discounts to your product.
- SKU stands for Stock Keeping Unit. It should be a unique set of characters which will not match to any other product. Let’s say you have 10 pieces of the product and you don’t want to receive after orders are placed for 10 units. If you enable stock management and enter 10 in the quantity field, then after 10 units are ordered, this product will show a message that all the quantities are sold and there is no stock.
- Delivery (Delivery). This is where cost of delivery is set. Check on the this product require Delivery. Skip this part if your product does not require Delivery.
- Cross check to make sure all the product details are complete, Then click on save product.
- Your product will be verified by the Admin and will be published within 24 hours.
- If there is something wrong with the product, the product will not be approved.

Basic Details
The common information about a product are the product title, price, description. Discount price is optional. You can even schedule discounts for a certain amount of time. You can enter a starting date and end date to apply automatic discounts to your product.
Selecting Product Type – Simple Product
These types of products are simple and have no variants. They are single and standalone products, which does not require any other information to define different variants like size, color, or materials etc.
Selecting Product Type – Variable Product
A variable product is a product that has different types of variants. For example, you might want to sell a dress which is available in 3 different colors and sizes. So this option will enable you to add those colors and sizes you need. You can add variations based on anything you like, perhaps material used or the stitching style.
To create variations and attributes of your products, you will need to select Custom Attributes and then click Add Option. Then two blank fields will appear to input the variation name and attributes.
You can add as many variations and attributes as you want. When you are done, check the box Create variation using those attributes. The system will make all the combinations and will prompt you to add prices for those variations.
If you want to disable any variation, then you can uncheck the box on the left.
Quantity and variation picture adding function will not be available right away. You have to save the product once to get those options. Right after saving the product, the fields above will have a pencil icon on the right. Click on that to add more details to the variations.
Selecting Product Type – Grouped Product
Suppose you want to sell an Outfit. But you want to sell it along with a matching shoe and bag along with the outfit as a whole. Then you need to create a Grouped product.
When creating a group product, you are going to create two sets of products. i.e. The parent product, which is the main product on display, and then the child products, which will come under the parent product. The child products are the list of products contained in the grouped product and will be listed under the parent product.
Select Category
A product category in an online store is a way of organizing and grouping similar products together. It helps customers navigate through the store and find the products they are looking for more easily. For example, in a clothing store, product categories may include “Tops,” “Bottoms,” “Accessories,” and “Footwear.” Each category will contain all the relevant items, making it convenient for customers to browse and make selections.
Vendors need to select the category from the drop-down.
You will see a pop-up where you need to select the categories,
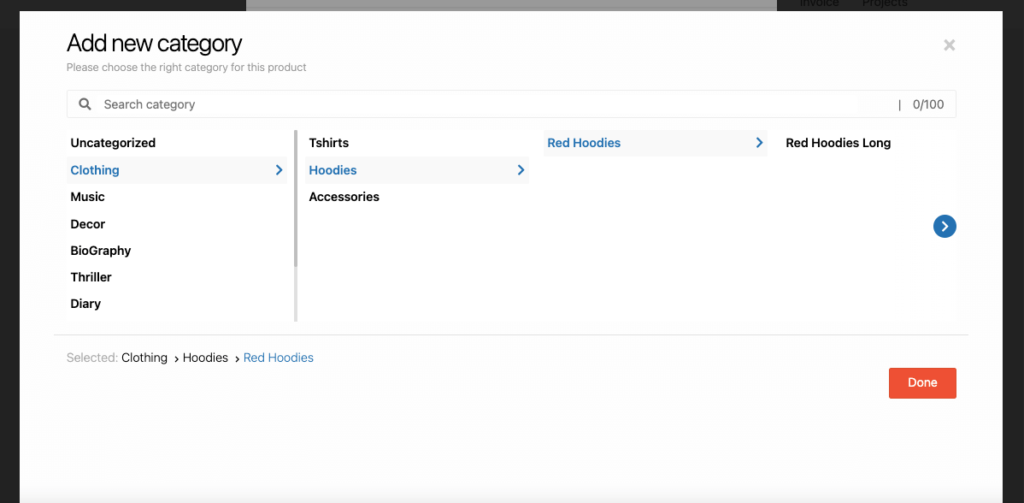
You can also search for categories as well. Just type the category name in the search box, you will see the matching categories,
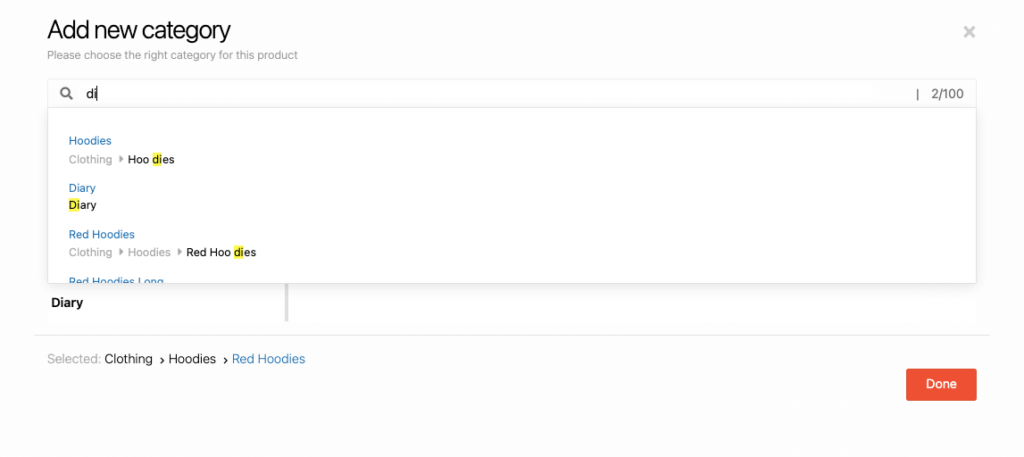
Click on the Done button to finish adding the categories.
Create Tags
A product tag in an online store is a keyword or phrase assigned to a specific product to help classify and organize it. Tags are typically used to create additional filters or search options for customers to easily find products based on specific criteria or characteristics. They represent specific attributes or descriptors related to the product, such as color, size, material, brand, style, or any other relevant feature. These tags enable customers to quickly narrow down their search and locate specific products within a larger product catalog. Additionally, product tags can assist in improving the search engine optimization (SEO) of an online store by optimizing the visibility and discoverability of products on search engines like google.
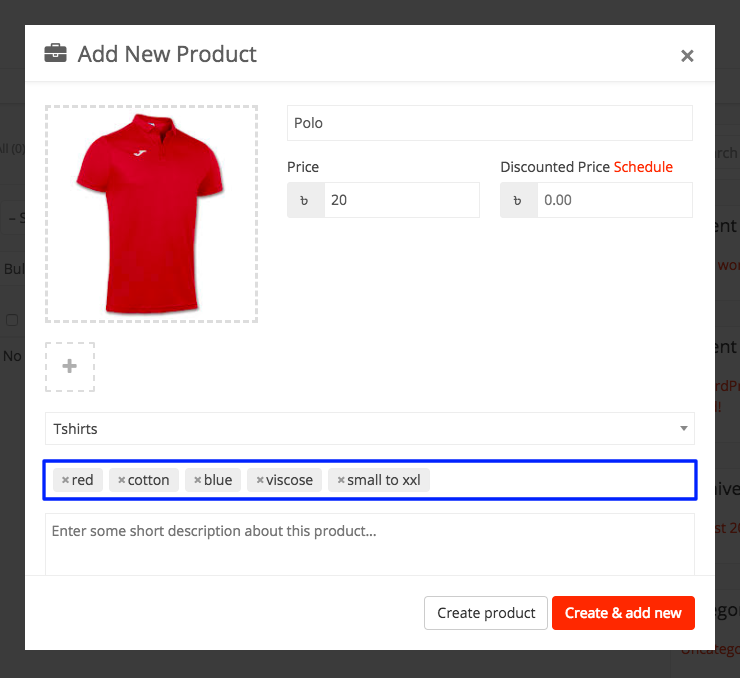
Under the Select Product Tags field, add a tag and Press Enter. The word or phrase will be added as a separate tag.
Order
Our online gives you easy navigation to manage orders. This way you will get a notification while the seller makes any sales, they can list orders, order-status, keep a note, and a lot more stuff.
Order Notification
Vendor will get mail notification in every order of his product. He would get a no-reply message from the system instantly after an order.
The order page displays the order detail in the list. This page shows order number, order total amount, earned amount, order status, customer details, order date and order action. you could view order farther details manage order status and delete order from order action.
You can filter the orders by Date. Besides that, you can also export the order list.

Order Status
Vendor could view and process order status from the order listing. He could complete the order from the action.

General Details
In this section, you will be able to view the order status, order date, earning amount from a specific order, customer id, email, phone number, customer IP etc.

Coupons (Optional)
Using coupons could be a great way to attract new customers for any particular occasion on your online shop. Suppose, you want to give our customers an offer or discount, so coupon feature will easily help you to create coupons within your online shop.
So in this documentation, you’ll learn how to create & manage coupons easily.
How to Create Coupons
To create a new coupon for your store, navigate to Vendor Dashboard->Coupons. Then click on Add New Coupon.

Next, fill the fields with all the details and then Add New Coupon.

Essential fields at a glance:
- Coupon Title: Add the name you want to give your coupon.
- Description: In this field, you can add what the coupon is about.
- Discount Type: This drop-down lets vendors select between a percentage and a fixed amount for your discount.
- Amount: Add the discount amount (percentage/fixed) here.
- Email Restrictions: Choose to limit the coupon to certain emails if you like. If you insert an email then only customers with that email would be able to use the coupon.
- Usage Limit: Add the number here if you want to restrict coupon usage to a certain amount.
- Expire Date: If you would like for the coupon to remain usable only up to a certain time, select the expiry date from here.
- Exclude Sale Items: Vendors can select this checkbox if they want to opt-out sale items from the coupon offer.
- Minimum Amount: Select the minimum amount an order should be for a customer to apply for the coupon.
- Product: Vendors can select one, multiple, or all products they are selling at their respective stores.
- Apply for New Products: if you check this box then when a customer applies this coupon for a new product then the customer will get discount accoding to that coupon.
- Exclude products: Vendors can also exclude the coupon from applying to a particular product or multiple products.
- Show on store: Select this checkbox to display the coupon code on your storefront.
Product (Fixed Amount) Discount
Fixed Amount Discount coupon means when a customer uses the coupon s/he will get a fixed amount discount mentioned on the coupon. Whatever the total order amount is s/he will get the same amount discount.

To use this option, select Product Discount from Discount Type drop-down.
This will also show when you view all your coupons from the Vendor Dashboard as Fixed Amount under Coupon Type.

Product Percentage (%) Discount
Product Percentage Discount means when a customer uses the coupon in his/her order then s/he will get a discount depends on his order total amount. He/she will get a discount of the percentage mentioned on the coupon of their total order.
To use this option, select Product % Discount from Discount Type drop-down.

This will also show when you view all your coupons together from the Vendor Dashboard as Percent under Coupon Type.

Show Coupon on StoreFront
You can show the coupon on store front by checking the last option on add coupon page.

This is how the coupon will display from your store frontend:

Reports
So let’s see what vendor report feature includes one by one:-
Report includes five major parts:-
- Overview
- Sales by day
- Top Selling
- Top Earning
- Statement
Overview
Sales Overview shows on the report page. On the top of the report, there are some options by which seller could view his sales report total overview, by day overview, top sale product reports and top earner product reports.
![]()
Sales by Day
The seller could view his one day order in this option. The report shows one day total selling total, the average, the total number of order, total purchased product number, coupon details, and one-day sales graph.
![]()
Top Selling Products
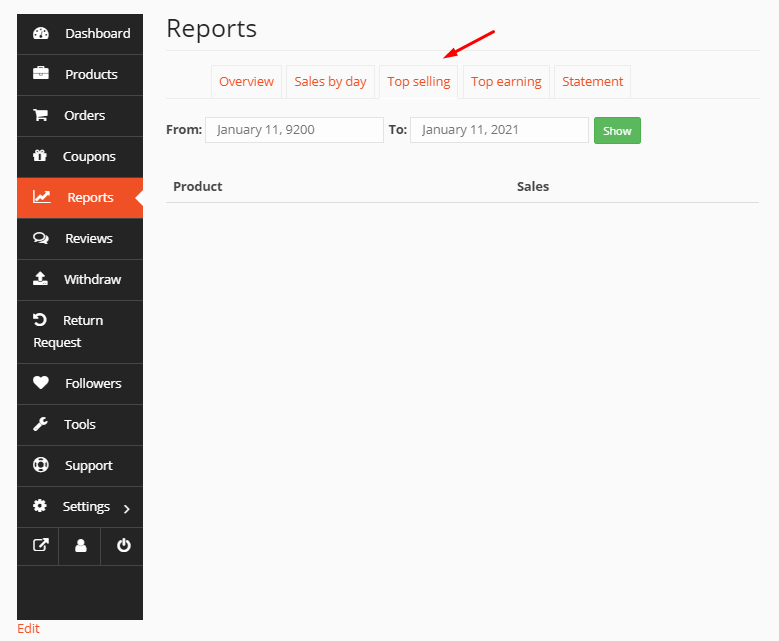
In the option,top seller- a seller could view his top-selling products and its total sale number with selling ratio graph line.
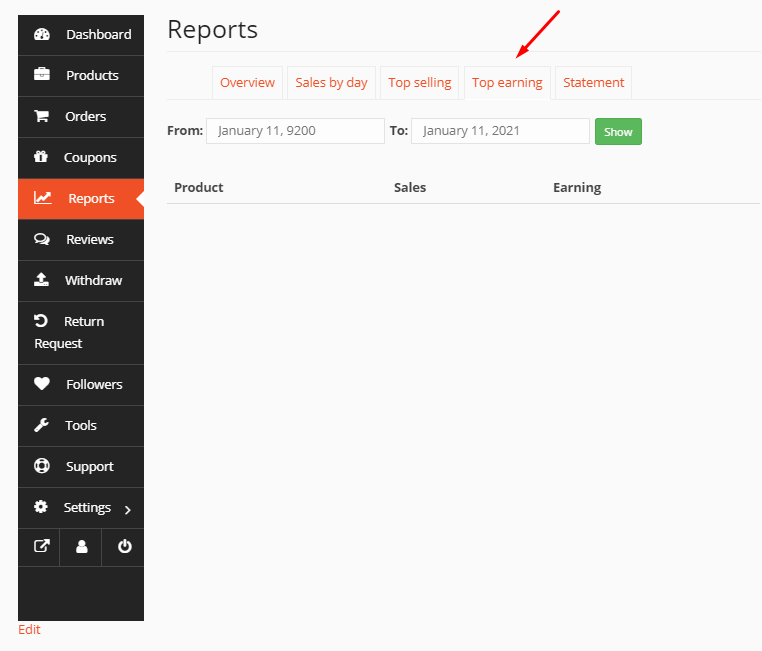
Top Earning Products
The seller could view his top selling products total selling amount in the option,top earner. The option could view manually by date.
Statement
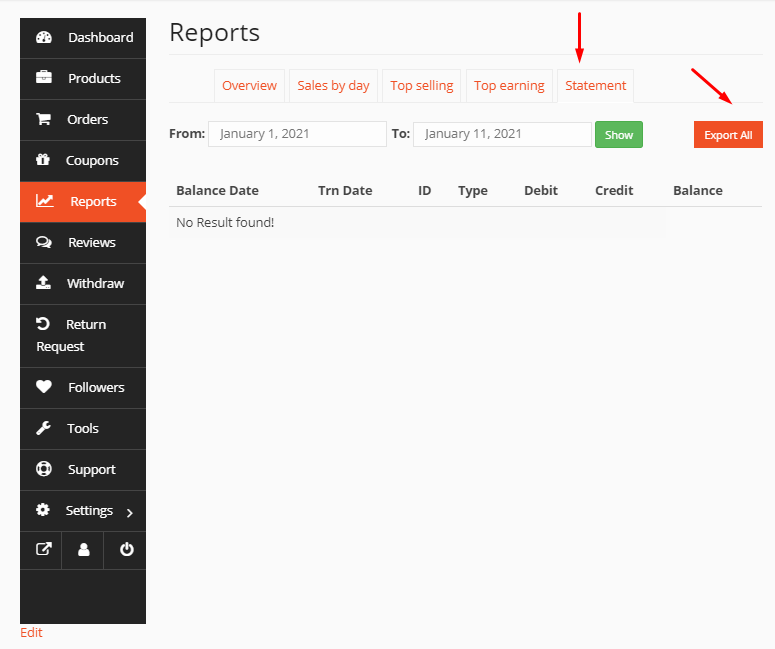
The statement will show up your transactions analyzing their debit-credit aspects. It will also demonstrate the transaction date, transaction id, Type, and Balance, or those transactions.
That’s it!
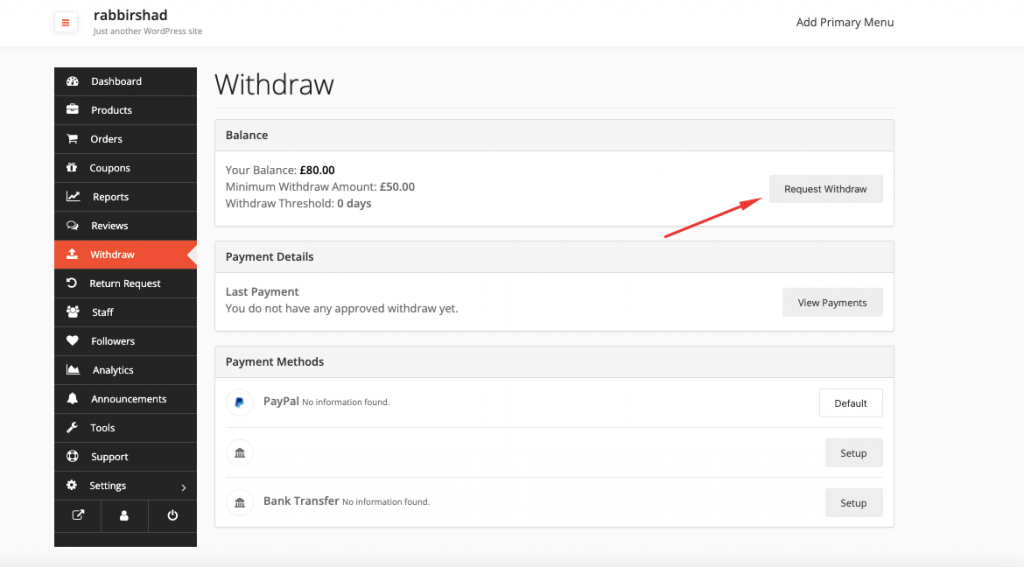
Vendors can request to withdraw their earnings. However, they need to request the amount within the withdraw threshold. However, withdrawal approval depends upon customer feedback, i.e if the customer have successfully receive the purchased item(s).
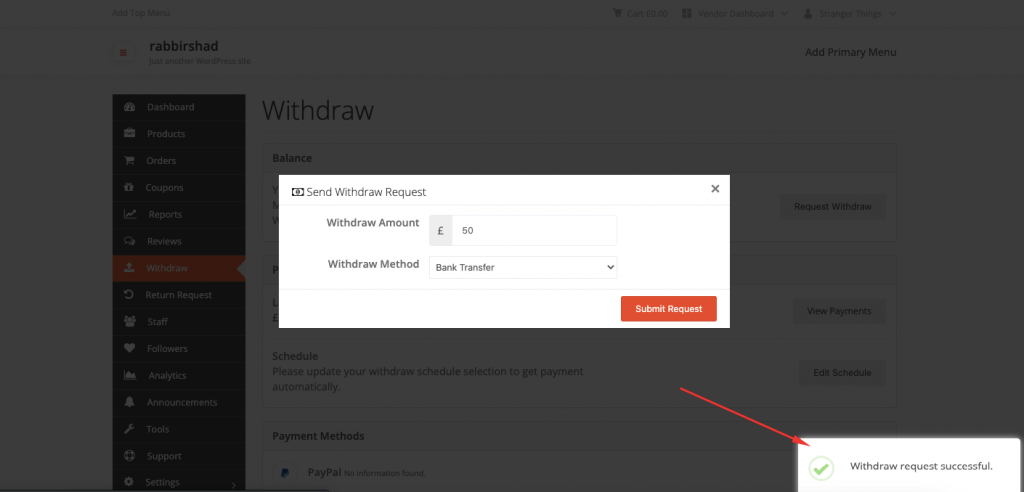
To request to withdraw earnings, the vendor needs to go to Vendor Dashboard–> Withdraw. There, they need to click the Request Withdraw button.
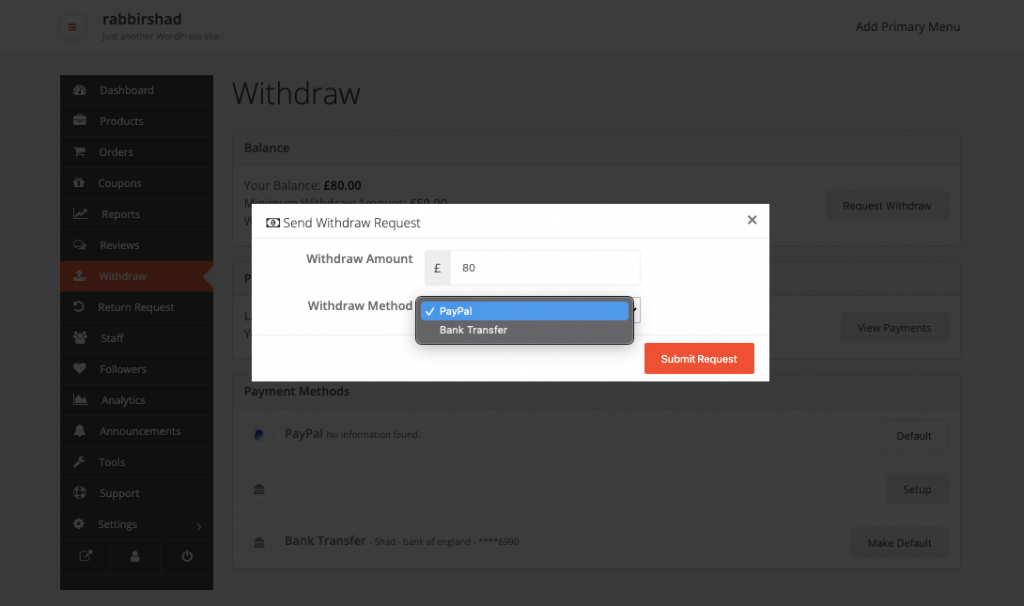
He/she will get a pop-up where he/she needs to add the withdraw amount and the payment method.
Hit the Submit Request button to finish.
If the request is successful, then the vendor will see that the request is created successfully.
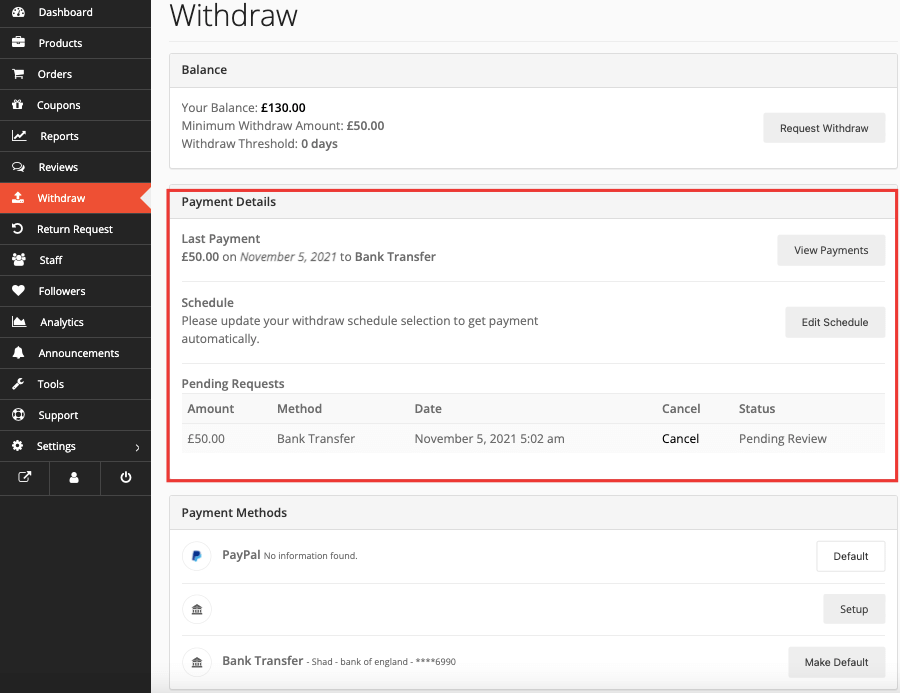
Vendors can see the request below,
Vendors with large stores like supermarkets can manage their online stores independently along staff. You can have staff with different permission levels and management, like ones who manage products, order, packaging, customers feedback and social media etc.
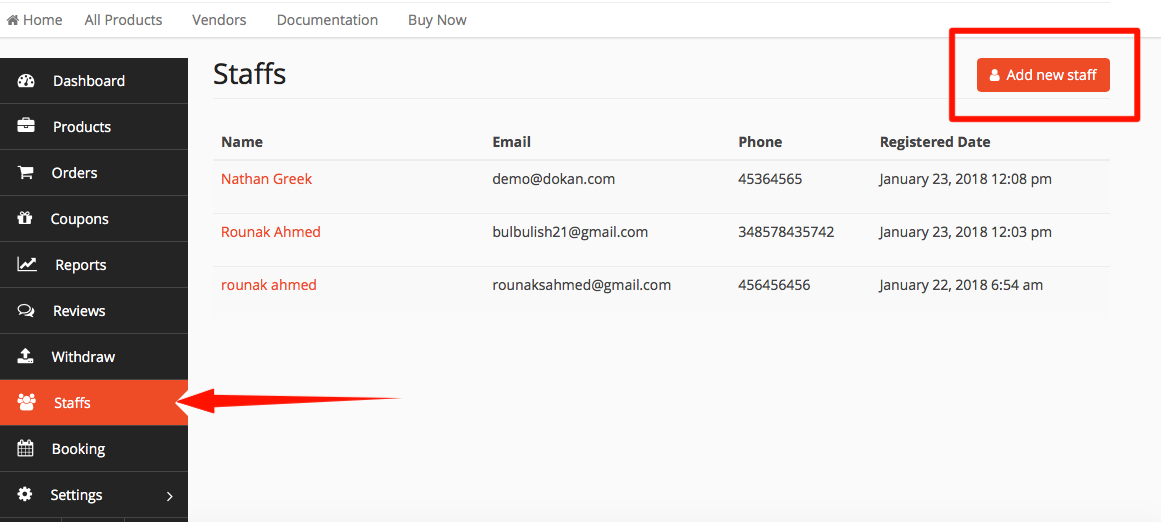
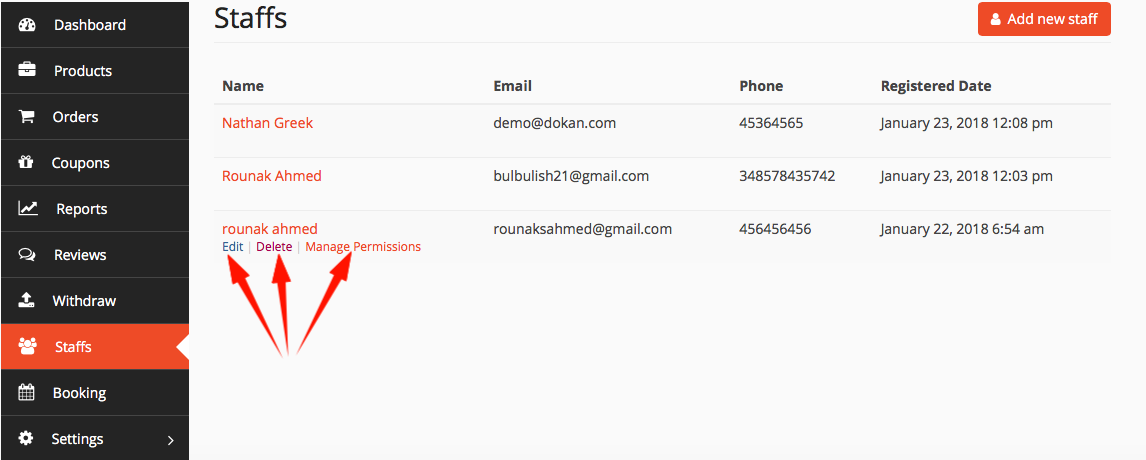
Vendors can create new personnel for their stores simply by clicking on Add New Staff. And that’s how easy it is to add your staff members!
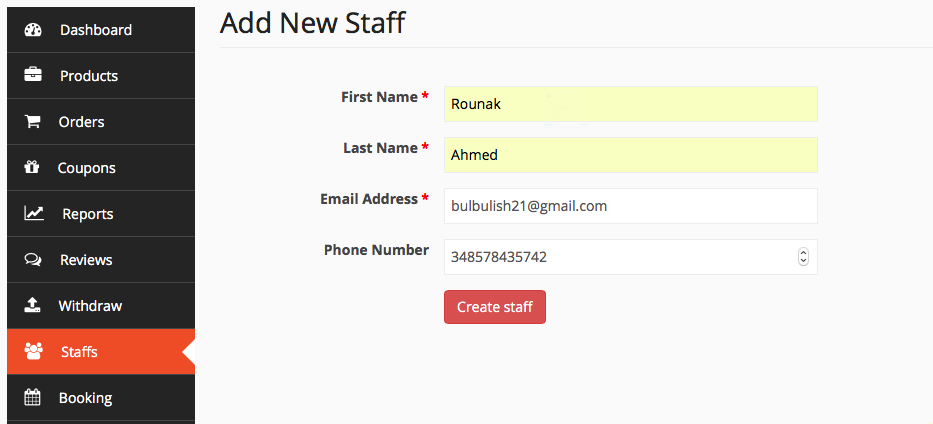
Vendors can also edit and delete every staff whenever they want.
Vendors can manage permissions for each staff added completely on their own authority
Manage Permissions for Online Staffs
The permissions manager is the most important feature of Vendor Staff Manager.
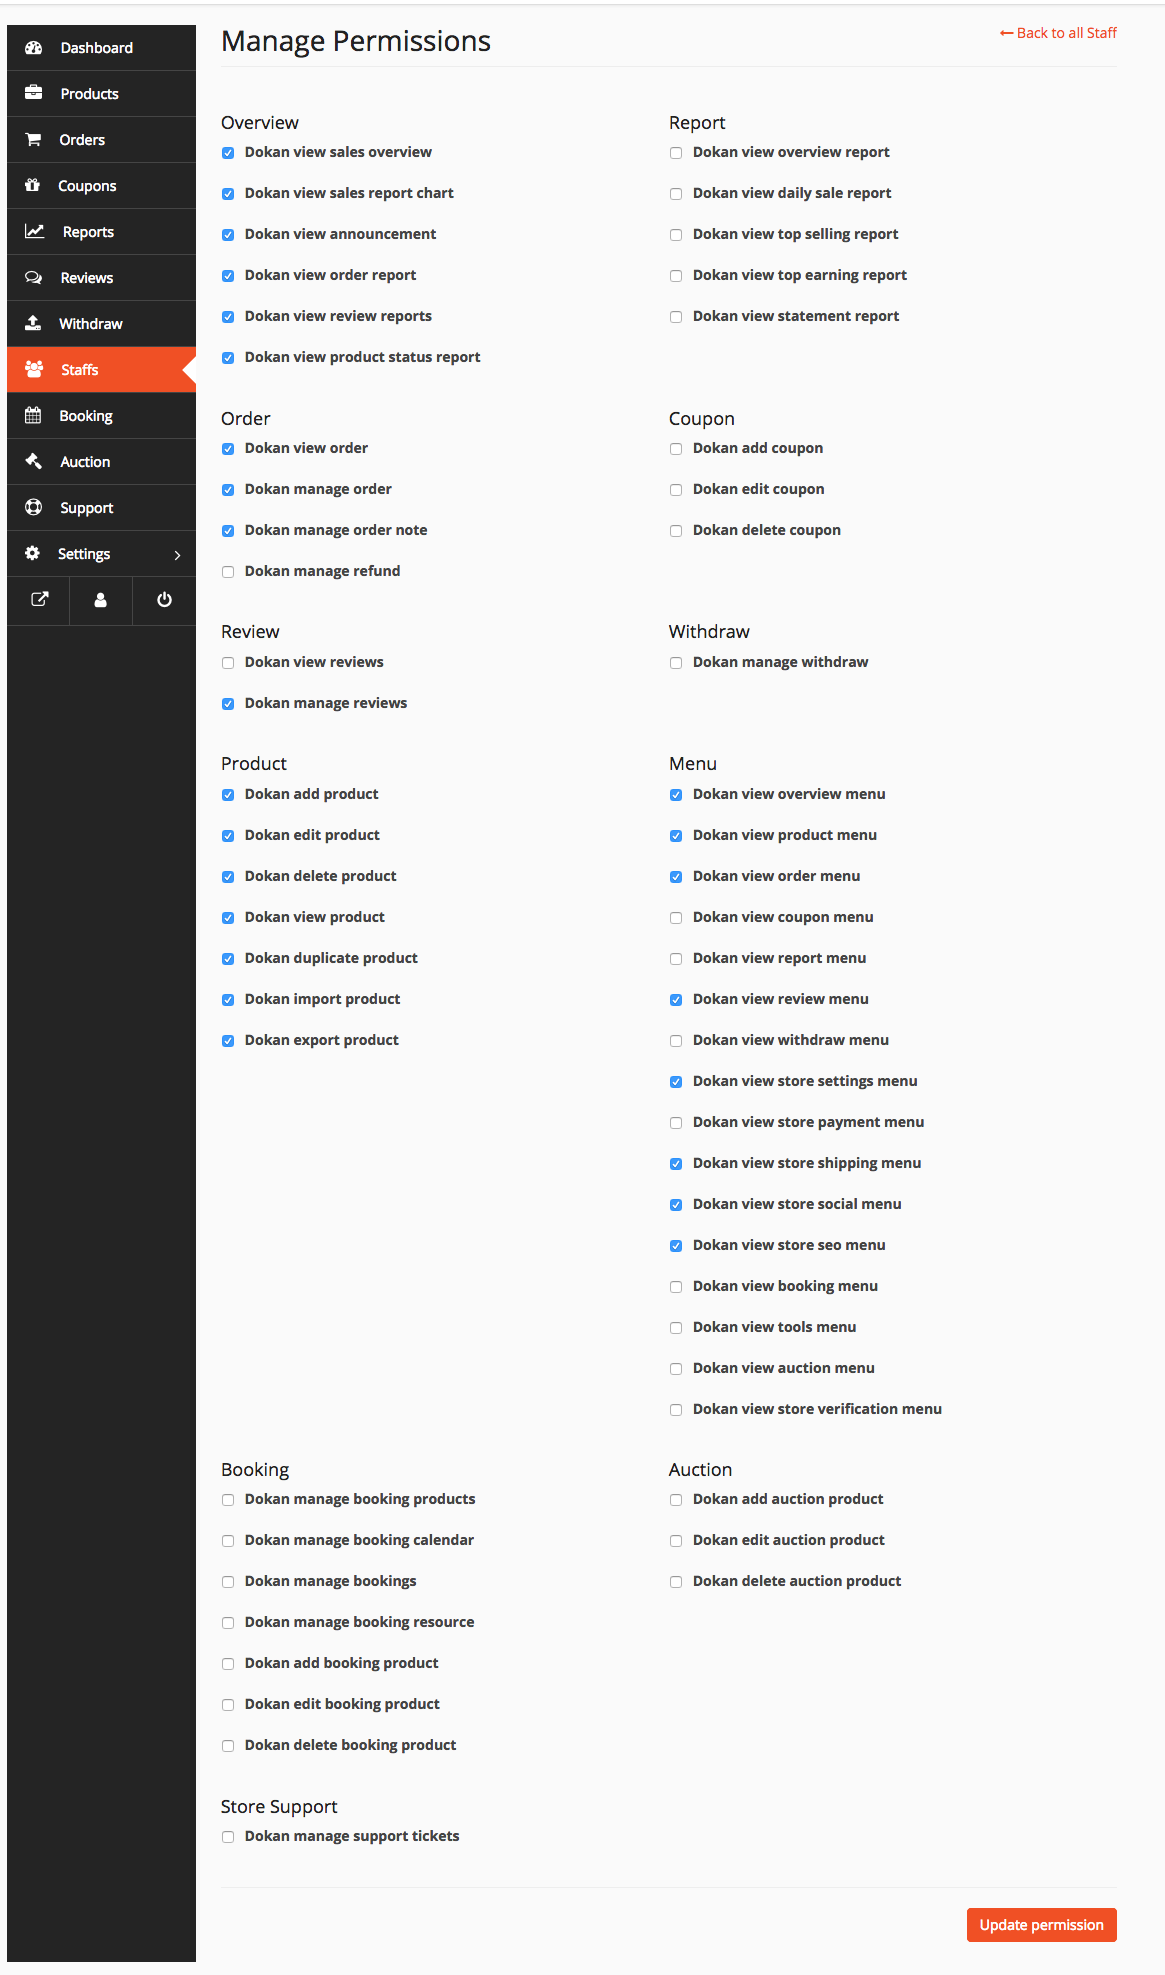
Vendors can change these access levels anytime they want. They have to simply check and uncheck the feature options and click on update permission.
If vendors want to turn off a category for a particular staff, they can simply disable the menu option for that category instead of unchecking every feature option. For example, if a vendor doesn’t want a staff to handle Products in any way, he can opt out Product menu, [Dokan View Product Menu] from the Menu options. Doing this will remove the Product menu altogether from that staff’s dashboard.
The changes will take place immediately on the Staff Dashboard.
Store Followers
Customers can follow the vendors whose products they like and want to stay updated with.
They can follow multiple vendors according to their interests. And the customers will get updates and emails about vendors newly added products.
Vendor View After Getting Follower
Now when a customer follows a specific vendor from your marketplace it will automatically show in the “Follower” section of frontend dashboard for that vendor.
To get to the Follower tab to view the details of the followed customer, the vendor would need to navigate through the My Account→Vendor Dashboard→Follower.
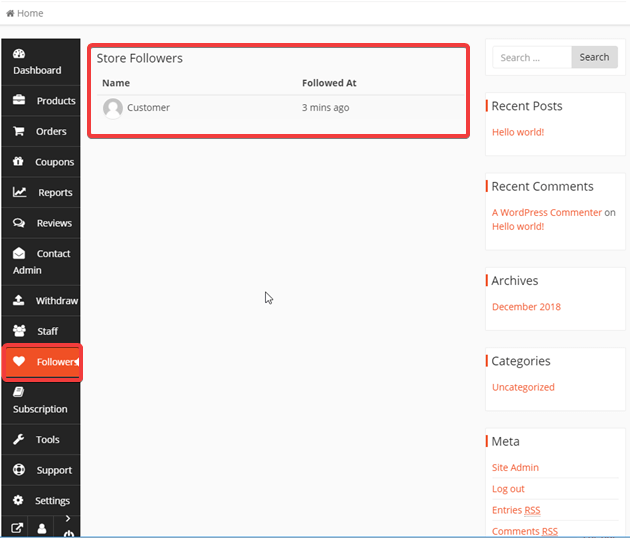
Vendors will be able to see the name and the time when that customer has followed them.
Support Section
This section allows customer to send feedback on product related issues. Also as a customer product received confirmation section.
Instruction For Vendors
To allow a vendor’s customers to send product-related queries and issues, the vendor needs to enable the support button display on his store page.
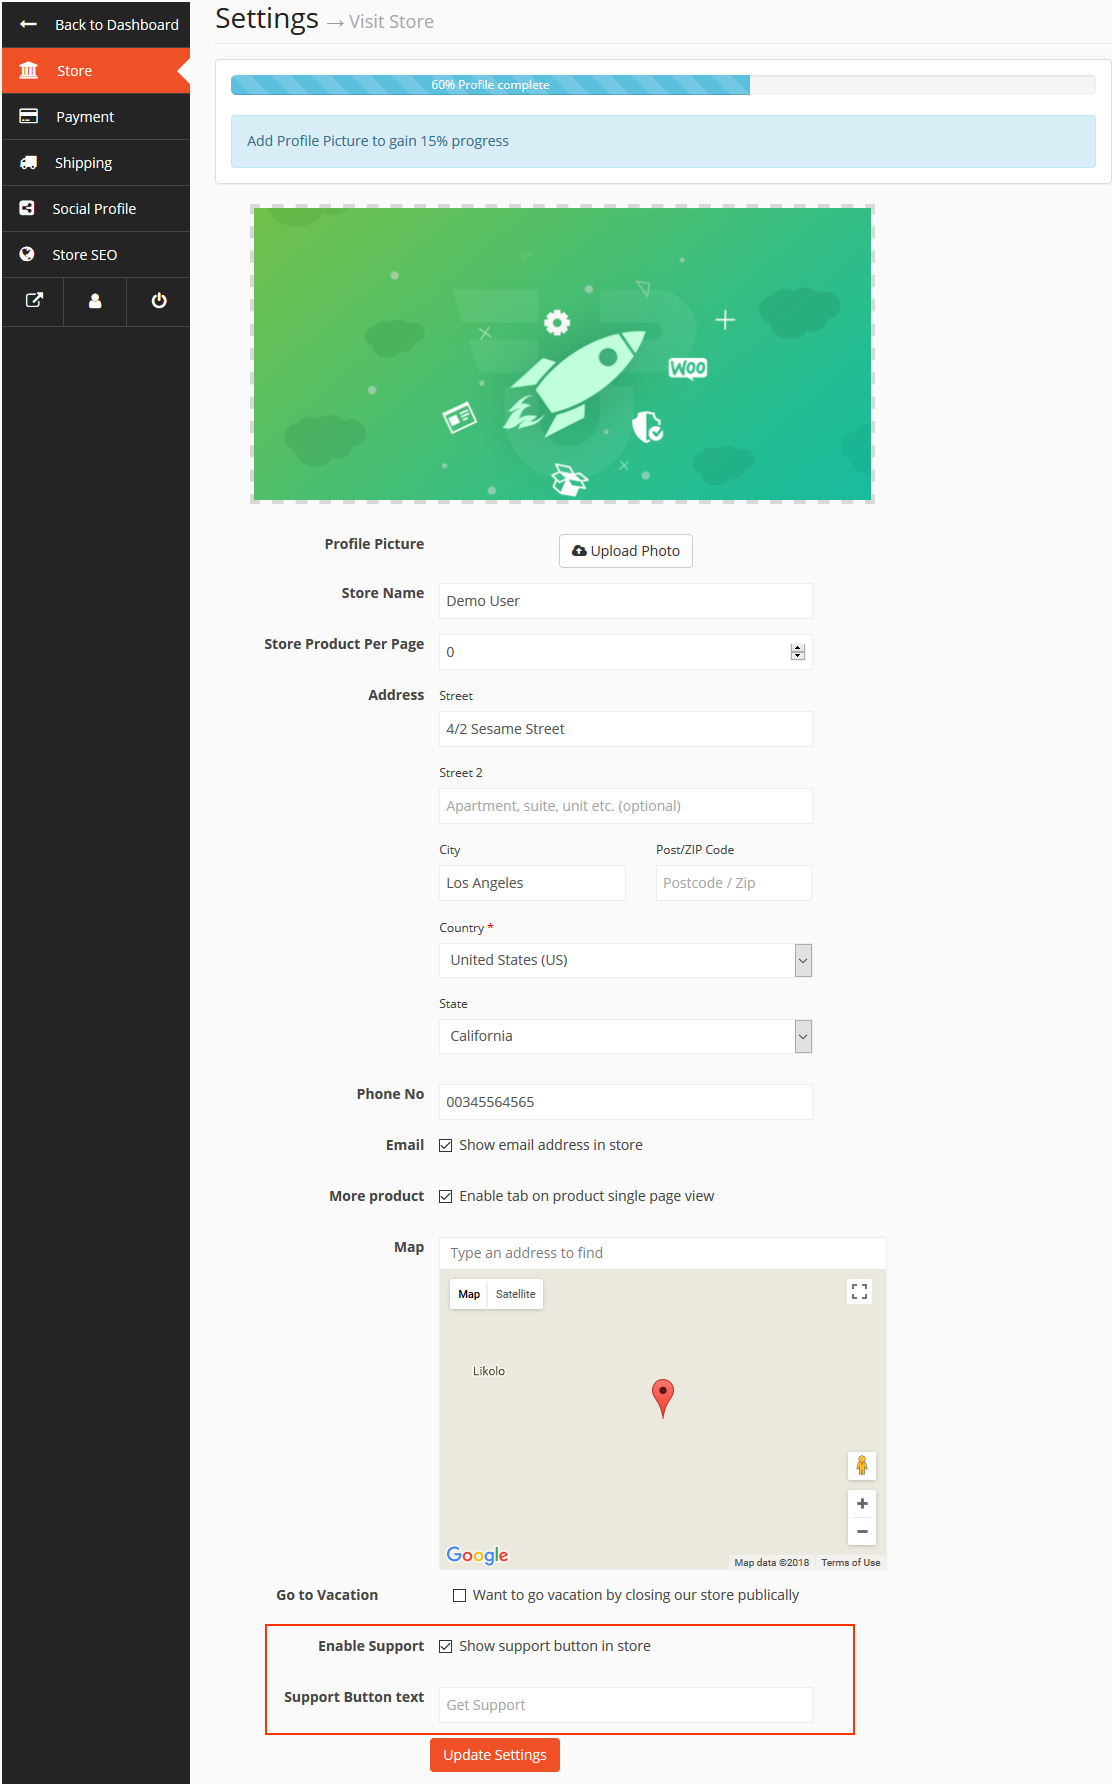
- To do this, navigate to Vendor Dashboard → Settings → Store.
At the very bottom of the page, you will get two new fields:
- Enable Support: You need to check the box for using store support feature.
- Support Button Text: You can modify the store support button text from here.
After configuring, click on the Update Settings button.
- When the admin enables Store Support module, a Support menu will also appear in the vendor’s dashboard.
To view this, go to Vendor Dashboard→Support.
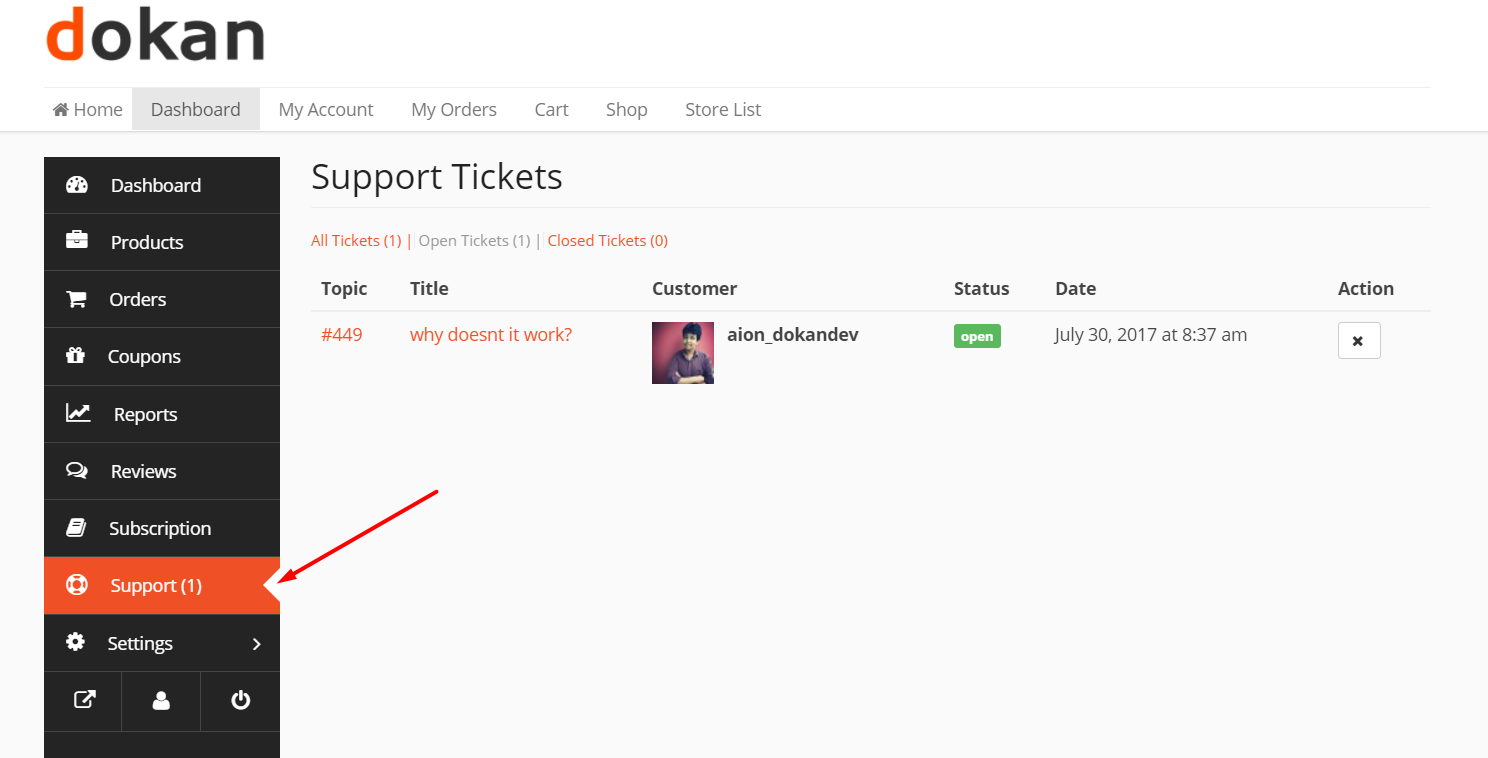
- After clicking on the Support menu, vendors will get to:
- View all their tickets under All Tickets.
- Filter them by Open Tickets and Closed Tickets.
- View Status and Title of each ticket, Customer’s name, Date when the ticket was created and also the Topic/order number.
- Close or Re-open a ticket directly from the Actions column with or without responding to the ticket. This action can be done from all 3 tabs – All Tickets, Open Tickets, and Close Tickets.
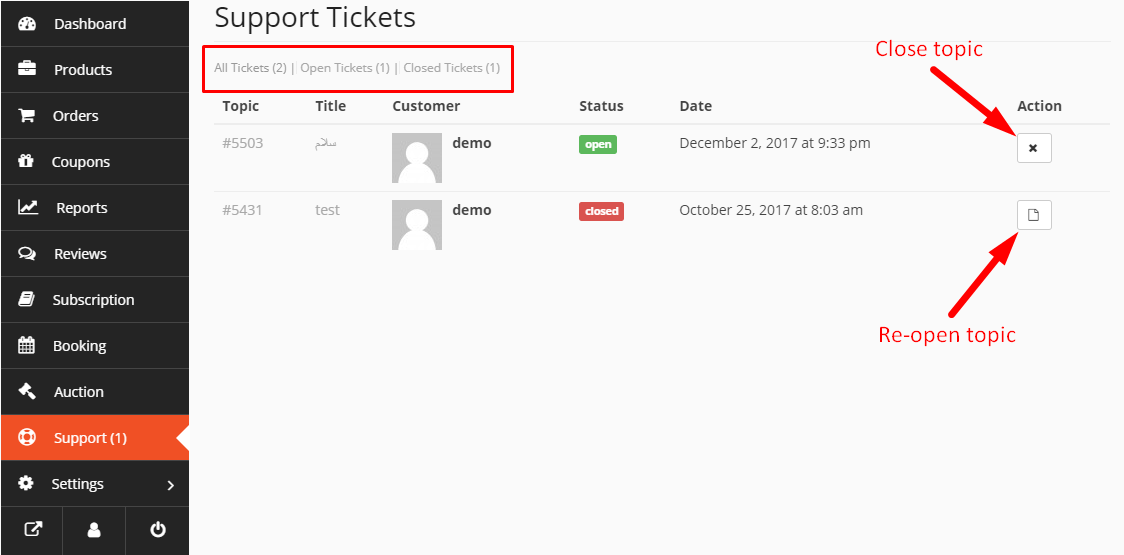
- To respond to a customer’s ticket, just click on the Topic or Title. This will open up a new page.
From here you [the vendor] can write your reply to your client in the given box.